Stamina Warden Solo Build - ESO Guide
Pure Class Stamina Warden (StamDen) Solo Build for ESO Update 50. Wild Adaptation and Glacial Obstinance add a lot of Weapon and Spell Damage. It also has great utility in the form of Bull Netch , which constantly cleanses debuffs, making some fights with purgable DoTs significantly easier.

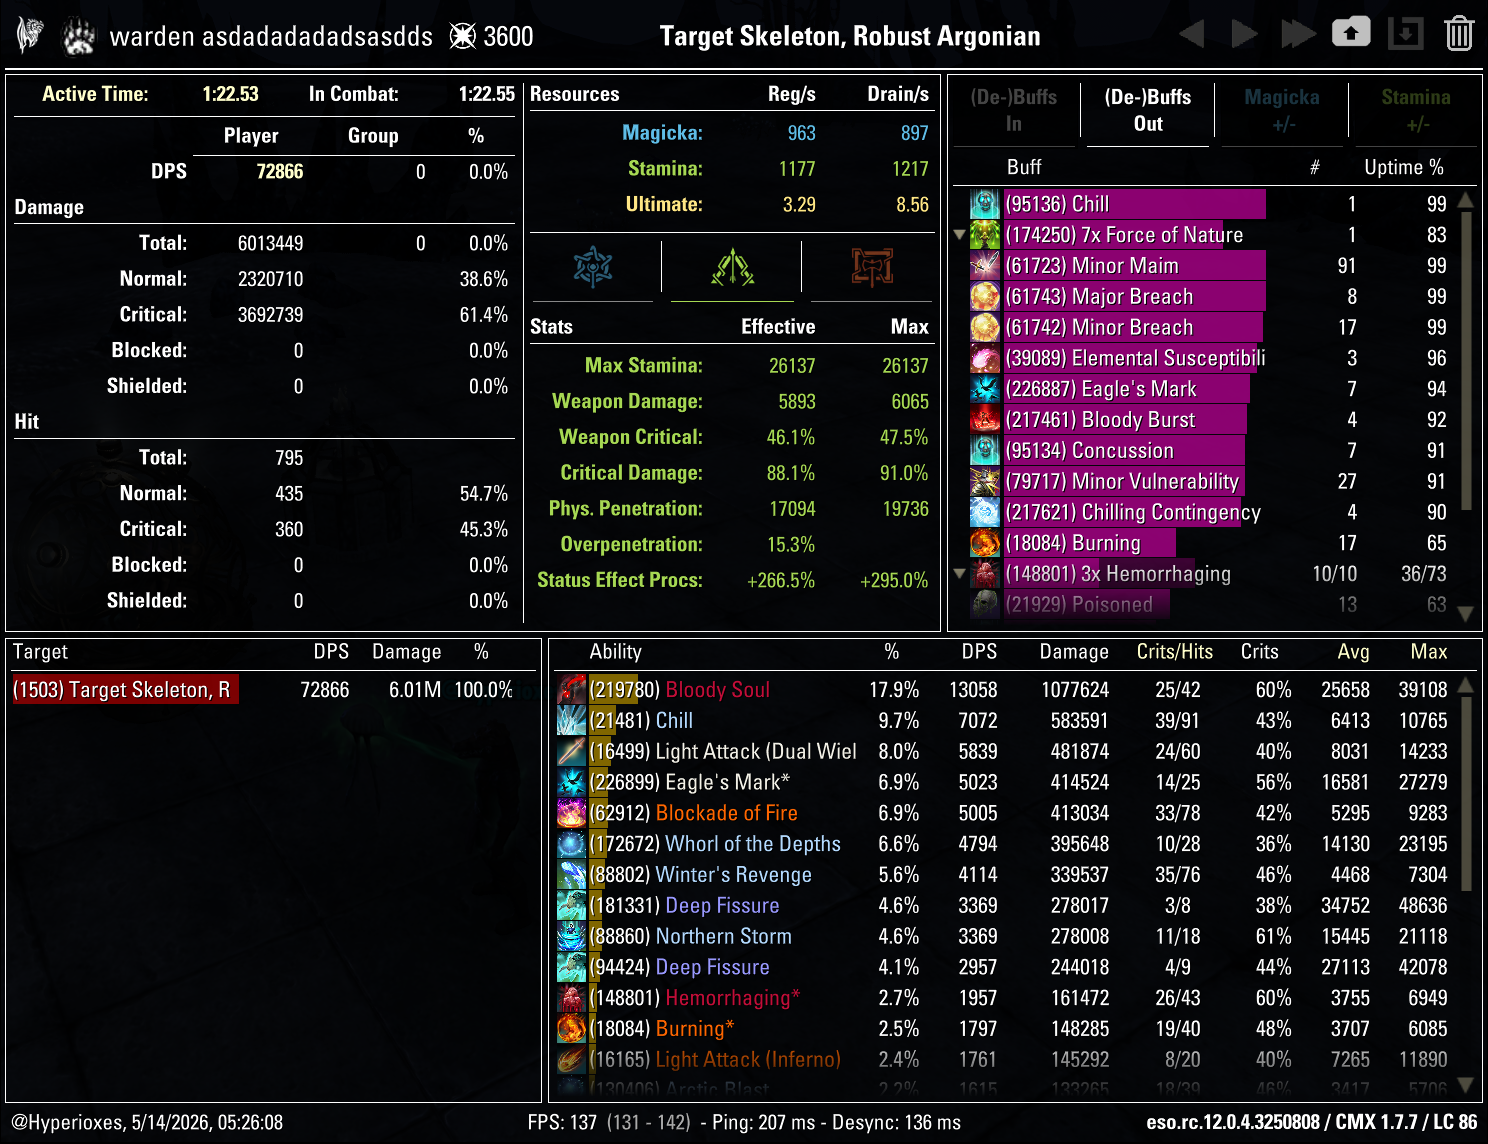
This setup soloed Veteran Dread Cellar and parses 72.8k in the Regular setup.
Works for all kinds of solo content - overland at any Challenge Difficulty up to Vestige, World Bosses, Maelstrom Arena, Vateshran Hollows, early arcs in Infinite Archive, and Veteran Dungeon soloing.

Simulated Parse Tables
I built a simulator that takes the exact setup from the guide and plays it through the rotation. It uses the listed gear, skills, Champion Points, race, food, potions, target armor and target health. It tracks skill casts, light attacks, DoT ticks, cooldowns, execute scaling, crits and status effect rolls. It assumes 100% of light attacks hit and a 0.026 second weave average.
For comparison tables I keep the setup identical and change one thing at a time. That makes the tables better for comparing options than random dummy parses, where one run can get better crits, different status effects or a better execute window.
Most comparison tables use deterministic rolls on a 15 million HP target. There is no 15 million Target Dummy in ESO. I use that health value because the 6 million dummy dies too fast, so random crits, status effects and execute timing can move the DPS by a lot. The real 6 million CMX parse is still shown later in the guide.
The simulations use Whorl of the Depths instead of Sul-Xan's Torment because you can't parse with Sul-Xan on the dummy, and I wanted the simulations confirmed with a parse.

| Run | Simulated DPS | Notes |
|---|---|---|
| 15m deterministic sim | Used for most comparison tables | |
| 6m deterministic sim | Same setup on real dummy health | |
| Real 6m CMX parse | Recorded in game | |
| 100 random 6m sims | This is why random parses are unreliable when crits and status effects roll differently |
Class Mastery
Class Masteries are a new U50 system where each class picks 2 of 5 passive bonuses (Class Mastery Points, not Skill Points). Activating subclassing disables Class Mastery, so it's a tradeoff between keeping your native skill lines or subclassing.
Default
Use Wild Adaptation and Glacial Obstinance .
The battlefield is your grove. Tend to it.
Gain 333 Weapon and Spell Damage for each status effect on your target, up to a maximum of 1665.
Tap into the wellspring of permafrost's resolve.
Upgrades to also activate when casting Winter's Embrace abilities and to grant 15% Weapon and Spell Damage for 10 seconds if you are at full Health after the heal.
Situational
The twisting of seasons has tempered your will.
Reduce your damage taken by 3% for every status effect active on your attacker, up to a maximum of 15%.
Not worth it
Expose your enemies to unrelenting cold.
Applying to an enemy also applies for 2.1 seconds, increasing their Critical Damage taken by 20%.
Share in the spoils of nature's abundance.
Upgrades rank 2 of to grant you and your group members for 3 seconds and an additional 125 Magicka and Stamina, up to once every 2 seconds.
Skill Setups
Base Setup
A base setup that will work for most situations and which should be your starting point when making situational setups
| Front Bar | Back Bar |
|---|---|
| Slot 1: Wield Soul | Slot 1: Lotus BlossomMorph of Lotus Flower |
| Slot 2: Deep FissureMorph of Scorch | Slot 2: Winter's RevengeMorph of Impaling Shards |
| Slot 3: Bull NetchMorph of Betty Netch | Slot 3: Elemental SusceptibilityMorph of Weakness to Elements |
| Slot 4: Arctic BlastMorph of Arctic Wind | Slot 4: Elemental BlockadeMorph of Wall of Elements |
| Slot 5: Soul Burst | Slot 5: Ulfsild's Contingency |
| Ultimate: Wild GuardianMorph of Feral Guardian | Ultimate: Northern StormMorph of Sleet Storm |
Every Animal Companions ability on your bar will trigger the Advanced Species passive, increasing your Critical Damage by 5% each
- Wield Soul ( Bleed , Druid's Resurgence , Resolve ) - a spammable which restores 600 Stamina and Magicka with each cast. It's also our source of Major Resolve , increasing armor by 5948.
- Deep Fissure - deals a lot of damage per cast and applies crucial Major Breach and Minor Breach debuffs.
- Bull Netch - gives Stamina back over time, grants Major Brutality and Major Sorcery , and every 5 seconds either removes one negative effect or, if none is removed, increases your damage done by 5% for 5 seconds
- Arctic Blast - a 20 second DoT around you which will deal a lot of damage by proccing the Chilled status effect. It can also be used as a self-heal if there are no enemies around you.
- Soul Burst ( Bleed , Lingering Torment , Resolve ) - an AoE DoT that grants you Minor Resolve , increasing your armor by 2974. This is your AoE spammable.
- Wild Guardian - only front-barred for the 5% Critical Damage bonus from Advanced Species . Don't summon it and don't spend Ultimate on it.
- Lotus Blossom - provides Major Savagery and Major Prophecy plus some passive healing whenever you Light or Heavy Attack. This healing also triggers the Nature's Gift passive.
- Winter's Revenge - a ground DoT that deals massive damage when you count in the Chilled procs, triggered thanks to this skill's increased innate chance to proc status effects.
- Elemental Susceptibility - an extremely strong ability that does a multitude of things. It's completely free to cast so it'll help you sustain. It applies Major Breach , which reduces enemies' armor by 5948, which doesn't matter in this specific build because we already get that from Deep Fissure , but it also applies Burning , Chilled and Concussed status effects at the beginning and then every 7.5 seconds. All of these status effects deal decent damage, but Concussed will also apply Minor Vulnerability for 4 seconds, increasing enemies' damage taken by 5%. Chilled will also apply Minor Maim for 4 seconds, reducing enemies' damage done by 5%.
- Elemental Blockade - a 15 second ground DoT which will constantly proc your Weapon Damage enchantment.
- Ulfsild's Contingency ( Frost , Lingering Torment , Force ) - deals damage in an AoE, applies a 22 second DoT and grants you Minor Force , increasing your Critical Damage by 10%. It is delayed until the next ability with a cost.
- Northern Storm - a powerful ultimate that deals damage in an AoE, increases your damage done and grants you Major Protection , reducing your damage taken by 10%.


Winter's Revenge and Arctic Blast are the first skills that have to go if you need to slot something situational, in that order, unless the situational skill specifically says that it's replacing something else
- Resolving Vigor - use it for fights where there's a lot of damage happening in a short burst. The HoT from Resolving Vigor is short but very strong, so casting it at the right time can help you survive such mechanics. It replaces Soul Burst since both apply Minor Resolve .
- Living Trellis - a healing ability you can spam under big pressure, also good for fights where you're getting hit very frequently
- Shimmering Shield - massive damage shield that works only against projectiles. Extremely strong but very situational.
- Silver Leash - a chain ability that you can slot in trash packs to stack enemies and get through them faster
- Ulfsild's Contingency ( Frost , Gladiator's Tenacity , Force ) - a different script combination which trades the DoT from Lingering Torment for the mitigation from Gladiator's Tenacity . Use it in fights where you need more damage mitigation.
- Revealing Flare - slot it for more difficult fights where you need more damage mitigation. It's a skill that passively grants Major Protection , reducing your damage taken by 10%. It will also trigger the Magicka Aid passive, which increases Magicka Recovery by 10%
- Precognition - an ultimate that breaks you out of some otherwise unavoidable stuns, you'll need it to get around some mechanics which are otherwise impossible or very difficult to solo, like for example Inferno's Hold in Zaan the Scalecaller fight


| Rotation | Simulated Parse | Damage Change |
|---|---|---|
| Priority List | Baseline | |
| Static Rotation | -6.4% |
Priority List
A list of priorities. Simply recast abilities when they run out and follow this list of priorities when there are multiple things to refresh.
- 1. Lotus Blossom - refresh 1 second early
- 2. Bull Netch - refresh 1 second early
- 3. Elemental Susceptibility
- 4. Elemental Blockade
- 5. Deep Fissure
- 6. Winter's Revenge
- 7. Northern Storm when available
- 8. Arctic Blast
- 9. Ulfsild's Contingency - refresh 1 second early
- 10. Soul Burst
- 11. Wield Soul
Static Rotation
This might be easier for some players, but it is weaker than the priority list.
Lotus Blossom stays outside this repeating Static Rotation because it lasts 60 seconds. Refresh it separately when it runs out and cast Northern Storm when available.
- 1. Bull Netch
- 2. Deep Fissure
- 3. Winter's Revenge
- 4. Elemental Blockade
- 5. Elemental Susceptibility
- 6. Arctic Blast
- 7. Ulfsild's Contingency
- 8. Soul Burst
- 9. Wield Soul
- 10. Wield Soul
- 11. Deep Fissure
- 12. Wield Soul
- 13. Wield Soul
- 14. Wield Soul
- 15. Winter's Revenge
- 16. Elemental Blockade
- 17. Wield Soul
- 18. Wield Soul
- 19. Wield Soul
- 20. Wield Soul
- 21. Wield Soul
- 22. Wield Soul
Pre-buff
These abilities can be pre-cast before entering combat
- Lotus Blossom
- Bull Netch
- Arctic Blast
- Soul Burst
- Deep Fissure
- Ulfsild's Contingency
Final Setups
A few examples of final setups you could end up with after applying the situational skills to the base setup
A setup for trash packs
| Front Bar | Back Bar |
|---|---|
| Slot 1: Wield Soul | Slot 1: Lotus BlossomMorph of Lotus Flower |
| Slot 2: Deep FissureMorph of Scorch | Slot 2: Winter's RevengeMorph of Impaling Shards |
| Slot 3: Bull NetchMorph of Betty Netch | Slot 3: Silver LeashMorph of Silver Bolts |
| Slot 4: Arctic BlastMorph of Arctic Wind | Slot 4: Elemental BlockadeMorph of Wall of Elements |
| Slot 5: Soul Burst | Slot 5: Ulfsild's Contingency |
| Ultimate: Wild GuardianMorph of Feral Guardian | Ultimate: Northern StormMorph of Sleet Storm |
What Changes
Changes compared to the Base Setup
- Silver Leash replaces Elemental Susceptibility
A setup which trades damage for more survivability. Use it against harder boss fights or if you simply want a tankier build and don't mind fights taking longer
| Front Bar | Back Bar |
|---|---|
| Slot 1: Wield Soul | Slot 1: Lotus BlossomMorph of Lotus Flower |
| Slot 2: Deep FissureMorph of Scorch | Slot 2: Arctic BlastMorph of Arctic Wind |
| Slot 3: Bull NetchMorph of Betty Netch | Slot 3: Elemental SusceptibilityMorph of Weakness to Elements |
| Slot 4: Revealing Flare | Slot 4: Elemental BlockadeMorph of Wall of Elements |
| Slot 5: Soul Burst | Slot 5: Ulfsild's Contingency |
| Ultimate: Wild GuardianMorph of Feral Guardian | Ultimate: Northern StormMorph of Sleet Storm |
What Changes
Changes compared to the Base Setup
- Revealing Flare replaces Arctic Blast on frontbar
- Arctic Blast moves to backbar, replacing Winter's Revenge
- Ulfsild's Contingency swaps the Lingering Torment script to Gladiator's Tenacity
Skill Setup Comparison
| Setup | Simulated Parse | Damage Change |
|---|---|---|
| Regular | Baseline | |
| Tanky | -7.6% |
Passives
Some trees are only needed when using situational skills, for example Psijic Order provides nothing without Precognition
 Class
Class
 Weapon
 Armor
Armor
 Guild
Guild
 Alliance War
 Racial
 Craft
Craft
Class - Animal Companions
 Bond with Nature - High Priority
 Savage Beast - High Priority
 Flourish - High Priority
 Advanced Species - High Priority
Class - Green Balance
 Accelerated Growth - Medium Priority
 Nature's Gift - High Priority
 Emerald Moss - Low Priority
 Maturation - High Priority
Class - Winter's Embrace
 Glacial Presence - High Priority
 Frozen Armor - High Priority
 Icy Aura - High Priority
 Piercing Cold - High Priority
Weapon - Dual Wield
The tooltips for Focused Killer and Ruffian are misleading. They also buff Light and Heavy Attacks.
 Focused Killer - Low Priority
 Ambidextrous - High Priority
 Controlled Fury - Not Needed
 Ruffian - Low Priority
 Twin Blade and Blunt - High Priority
Weapon - Destruction Staff
 Tri Focus - Low Priority
 Penetrating Magic - Low Priority
 Elemental Force - Medium Priority
 Ancient Knowledge - Medium Priority
 Destruction Expert - Low Priority
Armor - Light Armor
 Grace - Low Priority
 Evocation - High Priority
 Spell Warding - High Priority
 Prodigy - High Priority
 Concentration - High Priority
Armor - Medium Armor
 Dexterity - High Priority
 Wind Walker - High Priority
 Improved Sneak - Not needed
 Agility - High Priority
 Athletics - High Priority
Guild - Mages Guild
 Persuasive Will - Not needed
 Mage Adept - High Priority
 Everlasting Magic - High Priority
 Magicka Controller - High Priority
Might of the Guild - Low Priority


Guild - Psijic Order
 Clairvoyance - Low Priority
 Spell Orb - Not needed
 Concentrated Barrier - Low Priority
 Deliberation - Not needed
Alliance War - Support
Magicka Aid - Medium Priority
Combat Medic - Not needed
 Battle Resurrection - Not needed
Race - Your Race
Get all of your racials, no matter which race you are
Craft - Alchemy
 Solvent Proficiency - Not needed
 Keen Eye: Reagents - Not needed
 Medicinal Use - High Priority
 Chemistry - Not needed
 Laboratory Use - Not needed
 Snakeblood - Not needed
Gear
Overland (Base) is your starting point and works for most situations. Crafted is a beginner version using only craftable sets. Instanced is a swap for Arenas and Dungeons where enemies have higher armor.
Switching gear for trash packs isn't worth it unless you're using gear-swap addons
| Gear Slot | Set | Weight/Type | Trait | Enchantment |
|---|---|---|---|---|
 Head Head |
Slimecraw | Medium | Divines | Stamina |
 Shoulders Shoulders |
Sul-Xan's Torment | Medium | Divines | Stamina |
 Chest Chest |
Aerie's Cry | Medium | Divines | Stamina |
 Hands Hands |
Aerie's Cry | Medium | Divines | Stamina |
 Belt Belt |
Aerie's Cry | Light | Divines | Stamina |
 Legs Legs |
Aerie's Cry | Medium | Divines | Stamina |
 Boots Boots |
Aerie's Cry | Medium | Divines | Stamina |
 Necklace Necklace |
Sul-Xan's Torment | Jewelry | Bloodthirsty | Increase Physical Harm |
 Ring Ring |
Sul-Xan's Torment | Jewelry | Bloodthirsty | Increase Physical Harm |
| Ring |
Ring of the Pale Order | Jewelry | Bloodthirsty | Increase Physical Harm |
 Frontbar Main Hand Frontbar Main Hand |
Sul-Xan's Torment | Dagger | Charged | Poison |
 Frontbar Off Hand Frontbar Off Hand |
Sul-Xan's Torment | Dagger | Charged | Shock |
| Backbar Main Hand |
Crushing Wall | Ice Staff | Infused | Weapon Damage |


Fallback Gear


If you don't have it, use in order
- Aegis Caller - Dungeon Set (Unhallowed Grave)
- Tide-Born Wildstalker - Crafted
- Order's Wrath - Crafted

If you don't have it, use in order
- Whorl of the Depths - Trial Set (Dreadsail Reef)
- Aegis Caller - Dungeon Set (Unhallowed Grave)
- Symmetry of the Weald - Overland Set (West Weald)
- Order's Wrath - Crafted
- Tide-Born Wildstalker - Crafted


Alternative (same bonus)
- Iceheart - Direfrost Keep
- Zaan - Scalecaller Peak
- Grundwulf - Moongrave Fane
- Stone Husk - Stone Garden
- The Blind - Bedlam Veil
- Thousand Eyes - Night Market


| Gear Slot | Set | Weight/Type | Trait | Enchantment |
|---|---|---|---|---|
| Head |
Highland Sentinel | Medium | Divines | Stamina |
| Shoulders |
Order's Wrath | Medium | Divines | Stamina |
| Chest |
Tide-Born Wildstalker | Medium | Divines | Stamina |
| Hands |
Order's Wrath | Medium | Divines | Stamina |
| Belt |
Order's Wrath | Light | Divines | Stamina |
| Legs |
Order's Wrath | Medium | Divines | Stamina |
| Boots |
Order's Wrath | Medium | Divines | Stamina |
| Necklace |
Tide-Born Wildstalker | Jewelry | Bloodthirsty | Increase Physical Harm |
| Ring |
Tide-Born Wildstalker | Jewelry | Bloodthirsty | Increase Physical Harm |
| Ring |
Highland Sentinel | Jewelry | Bloodthirsty | Increase Physical Harm |
| Frontbar Main Hand |
Tide-Born Wildstalker | Dagger | Charged | Poison |
| Frontbar Off Hand |
Tide-Born Wildstalker | Dagger | Charged | Shock |
| Backbar Main Hand |
Tide-Born Wildstalker | Ice Staff | Infused | Weapon Damage |
The setup in the table uses only crafted gear, but if you already own parts of the Base setup like Ring of the Pale Order you can start using them immediately.
| Gear Slot | Set | Weight/Type | Trait | Enchantment |
|---|---|---|---|---|
| Head |
Slimecraw | Medium | Divines | Stamina |
| Shoulders |
Sul-Xan's Torment | Medium | Divines | Stamina |
| Chest |
Aerie's Cry | Medium | Divines | Stamina |
| Hands |
Aerie's Cry | Light | Divines | Stamina |
| Belt |
Aerie's Cry | Light | Divines | Stamina |
| Legs |
Aerie's Cry | Medium | Divines | Stamina |
| Boots |
Aerie's Cry | Light | Divines | Stamina |
| Necklace |
Sul-Xan's Torment | Jewelry | Bloodthirsty | Increase Physical Harm |
| Ring |
Sul-Xan's Torment | Jewelry | Bloodthirsty | Increase Physical Harm |
| Ring |
Ring of the Pale Order | Jewelry | Bloodthirsty | Increase Physical Harm |
| Frontbar Main Hand |
Sul-Xan's Torment | Dagger | Charged | Poison |
| Frontbar Off Hand |
Sul-Xan's Torment | Dagger | Charged | Shock |
| Backbar Main Hand |
Crushing Wall | Ice Staff | Infused | Weapon Damage |
Fallback Gear
If you don't have it, use in order
- Whorl of the Depths - Trial Set (Dreadsail Reef)
- Tide-Born Wildstalker - Crafted
- Order's Wrath - Crafted
If you don't have it, use in order
- Whorl of the Depths - Trial Set (Dreadsail Reef)
- Symmetry of the Weald - Overland Set (West Weald)
- Aegis Caller - Dungeon Set (Unhallowed Grave)
- Tide-Born Wildstalker - Crafted
- Order's Wrath - Crafted
Alternative (same bonus)
- Iceheart - Direfrost Keep
- Zaan - Scalecaller Peak
- Grundwulf - Moongrave Fane
- Stone Husk - Stone Garden
- The Blind - Bedlam Veil
- Thousand Eyes - Night Market
What Changes
Changes compared to the Overland setup
- Weight composition goes from 6 Medium / 1 Light to 4 Medium / 3 Light
Use the Penetration Calculator to fine-tune your penetration for different content. Overland enemies have 9,100 armor while Instanced enemies (Arenas and Dungeons) have 18,200.

Gear Set Comparisons
Damage comparison for the set options.
Instanced Enemy - 18,200 Armor
All of these use 4 Medium / 3 Light and Force of Nature instead of Wrathful Strikes .

Body
Compares Sul-Xan's Torment + X body set.
| Body Set | Source | Simulated Parse | Damage Change |
|---|---|---|---|
| Aerie's Cry | Class Set - Infinite Archive | Baseline | |
| Ansuul's Torment | Trial - Sanity's Edge |
-2.8%
-13.0%
|
|
| Slivers of the Null Arca | Trial - Lucent Citadel | -8.6% | |
| Whorl of the Depths | Trial - Dreadsail Reef | -8.9% | |
| Tide-Born Wildstalker | Crafted | -10.7% | |
| Aegis Caller | Dungeon - Unhallowed Grave | -11.6% | |
| Symmetry of the Weald | Overland - West Weald | -13.0% | |
| Highland Sentinel | Crafted | -13.0% | |
| Tzogvin's Warband | Dungeon - Frostvault | -13.0% | |
| Order's Wrath | Crafted | -13.7% | |
| Pillar of Nirn | Dungeon - Falkreath Hold | -14.4% | |
| Frostbite | Overland - Blackwood | -14.4% | |
| Deadly Strike | PvP - Cyrodiil | -14.4% | |
| Mother's Sorrow | Overland - Deshaan | -15.6% | |
| Hunding's Rage | Crafted | -15.6% | |
| Briarheart | Overland - Wrothgar | -15.6% | |
| Law of Julianos | Crafted | -16.3% |


Weapons + Jewelry
Compares Aerie's Cry + X weapons and jewelry set.
| Set | Source | Simulated Parse | Damage Change |
|---|---|---|---|
| Ansuul's Torment | Trial - Sanity's Edge |
+2.6%
-7.0%
|
|
| Sul-Xan's Torment | Trial - Rockgrove |
Baseline
-10.6%
|
|
| Whorl of the Depths | Trial - Dreadsail Reef | -1.5% | |
| Slivers of the Null Arca | Trial - Lucent Citadel | -2.1% | |
| Symmetry of the Weald | Overland - West Weald | -7.7% | |
| Highland Sentinel | Crafted | -7.9% | |
| Aegis Caller | Dungeon - Unhallowed Grave | -8.0% | |
| Tide-Born Wildstalker | Crafted | -8.3% | |
| Tzogvin's Warband | Dungeon - Frostvault | -9.0% | |
| Order's Wrath | Crafted | -9.1% | |
| Pillar of Nirn | Dungeon - Falkreath Hold | -9.8% | |
| Frostbite | Overland - Blackwood | -9.8% | |
| Deadly Strike | PvP - Cyrodiil | -11.0% | |
| Briarheart | Overland - Wrothgar | -11.4% | |
| Mother's Sorrow | Overland - Deshaan | -11.4% | |
| Hunding's Rage | Crafted | -11.9% | |
| Law of Julianos | Crafted | -13.0% |
Overland Enemy - 9,100 Armor
All of these use 6 Medium / 1 Light and Wrathful Strikes instead of Force of Nature . Minor Slayer does not work against Overland enemies.

Body
Compares Sul-Xan's Torment + X body set.
| Body Set | Source | Simulated Parse | Damage Change |
|---|---|---|---|
| Aerie's Cry | Class Set - Infinite Archive | Baseline | |
| Ansuul's Torment | Trial - Sanity's Edge |
-1.1%
-11.4%
|
|
| Slivers of the Null Arca | Trial - Lucent Citadel | -5.1% | |
| Aegis Caller | Dungeon - Unhallowed Grave | -8.3% | |
| Highland Sentinel | Crafted | -9.0% | |
| Tide-Born Wildstalker | Crafted | -9.2% | |
| Order's Wrath | Crafted | -9.5% | |
| Pillar of Nirn | Dungeon - Falkreath Hold | -11.0% | |
| Deadly Strike | PvP - Cyrodiil | -11.0% | |
| Tzogvin's Warband | Dungeon - Frostvault | -11.4% | |
| Briarheart | Overland - Wrothgar | -13.0% | |
| Hunding's Rage | Crafted | -13.2% | |
| Law of Julianos | Crafted | -13.8% |
Weapons + Jewelry
Compares Aerie's Cry + X weapons and jewelry set.
| Set | Source | Simulated Parse | Damage Change |
|---|---|---|---|
| Ansuul's Torment | Trial - Sanity's Edge |
+1.1%
-7.9%
|
|
| Sul-Xan's Torment | Trial - Rockgrove |
Baseline
-11.0%
|
|
| Whorl of the Depths | Trial - Dreadsail Reef | -1.5% | |
| Slivers of the Null Arca | Trial - Lucent Citadel | -2.6% | |
| Highland Sentinel | Crafted | -3.5% | |
| Aegis Caller | Dungeon - Unhallowed Grave | -3.9% | |
| Symmetry of the Weald | Overland - West Weald | -4.4% | |
| Order's Wrath | Crafted | -5.4% | |
| Tide-Born Wildstalker | Crafted | -5.5% | |
| Tzogvin's Warband | Dungeon - Frostvault | -6.2% | |
| Pillar of Nirn | Dungeon - Falkreath Hold | -6.2% | |
| Frostbite | Overland - Blackwood | -6.2% | |
| Mother's Sorrow | Overland - Deshaan | -7.9% | |
| Deadly Strike | PvP - Cyrodiil | -8.1% | |
| Briarheart | Overland - Wrothgar | -8.1% | |
| Hunding's Rage | Crafted | -8.9% | |
| Law of Julianos | Crafted | -9.7% |
Front Bar Weapons
Daggers are the default weapon. Lightning and Inferno Staff are the best ranged weapons for when mechanics make melee annoying.
| Front Bar Weapon | Simulated Parse | Damage Change |
|---|---|---|
| Dual Wield Daggers | Baseline | |
| Lightning Staff | -2.8% | |
| Inferno Staff | -3.0% | |
| Bow | -4.8% | |
| Ice Staff | -5.1% | |
| Greatsword | -6.4% | |
| Restoration Staff | -11.7% | |
| One Handed and Shield | -14.9% |
Only the front bar weapon changes. Daggers use Charged Poison and Charged Shock . Every one-weapon option uses a Charged Poison weapon. One Handed and Shield uses a Charged Poison one handed weapon plus a Divines Stamina shield.
Situational Swaps
Alternative setups for different goals and content types
- Shattered Path's Signet replaces Ring of the Pale Order if you want more damage, but you lose self-healing and it also drains Ultimate. Do not spend Ultimate.
- Use Ansuul's Torment in fights where you can interrupt something at least once every 30 seconds.
- Replace Sul-Xan's Torment in fights with no adds. Whorl of the Depths is the strongest fallback. Use Tide-Born Wildstalker if you don't have it

Additional Tips
- You can change some (or all) of the Stamina enchants to Health ones for extremely hard hitting bosses
- You can use more Medium armor in Instanced content when you need more mitigation or want to dodge roll more. This deals less damage and requires switching your Mundus to The Lover . Go from 4 Medium (Instanced setup) to 6 Medium, then swap Force of Nature back to Wrathful Strikes since the extra penetration now comes from The Lover
- If you want to use the Crafted Only setup for Instanced content (Arenas and Dungeons), switch to a 4 Medium / 3 Light weight split just like the Instanced setup

Champion Points
 Fitness
 Craft
CraftRace
For solo you need both damage and survivability, so every race brings something to the table. I use Nord because in difficult solo content the armor racial is worth the DPS trade-off. If you want to use a different race, the table shows comparison between their DPS.

 Rugged
2600 armor
Stalwart
1500 Max Stamina, 0.5 Ultimate per second
Rugged
2600 armor
Stalwart
1500 Max Stamina, 0.5 Ultimate per second
 Resist Frost
1000 Max Health, 4620 Frost Resistance
Resist Frost
1000 Max Health, 4620 Frost Resistance
| Race | Simulated Parse | Damage Change |
|---|---|---|
| Khajiit | +3.6% | |
| Dark Elf | +3.5% | |
| Orc | +3.0% | |
| High Elf | +2.4% | |
| Wood Elf | +1.5% | |
| Redguard | +0.5% | |
| Imperial | +0.5% | |
| Nord | Baseline | |
| Argonian | -0.4% | |
| Breton | -1.0% |
Mundus
-
 Default
The Thief
5.53% Critical Chance(9.04% with 7 Divines)Use most of the time. It increases your Critical Chance -
 Instanced
The Lover
2744 Penetration(4489 with 7 Divines)Switch when using 6 Medium armor pieces in Instanced content. Provides penetration to compensate for the higher armor of Instanced enemies. -
 Difficult Content
The Lady
2744 Armor(4489 with 7 Divines)Consider switching for extremely difficult dungeons. It increases your Armor
Attributes
For most content you should put all 64 points into Stamina. For difficult content you should devote as many attribute points as necessary to Health - for some content you'll be able to get away with 32 Health 32 Stamina, for the extremely difficult stuff you'll need 64 Health.
| Attributes | Simulated Parse | Damage Change |
|---|---|---|
| 64 Stamina | Baseline | |
| 32 Health / 32 Stamina | -2.4% | |
| 64 Health | -4.7% |
As you can see, the damage loss from changing attributes is minimal, but you gain up to 7808 Health, so change attributes whenever you struggle with some harder enemy.
Food
-
 Default
Orzorga's Smoked Bear Haunch
Max Health +4,312 Health Recovery +406 Stamina Recovery +369 Magicka Recovery +369The default option. Our Armor potions don't restore resources, so the food has to cover Stamina and Magicka Recovery.Cheaper alternative Jewels of MisruleDifference Max Health +3,927 −385 Health Recovery — −406 Stamina Recovery +357 −12 Magicka Recovery +357 −12 -
 Full Damage
Braised Rabbit with Spring Vegetables
Max Health +5,395 Max Stamina +4,936Full damage option. Trades the recoveries for Max Stamina and more Max Health, but you'll need Tri-Stat or Heroism potions in order to sustain.


| Setup | Simulated Parse | Damage Change |
|---|---|---|
| Orzorga's Smoked Bear Haunch + Armor Potion | Baseline | |
| Braised Rabbit with Spring Vegetables + Tri-Stat or Heroism Potion | +3.1% |
Potions
-
Default
Armor Potion
Restore Health Spell Resistance Physical ResistanceThe default option. Gives you 5,280 Armor, which is a lot of damage mitigation. -
Full Damage
Tri-Stat Potion
Restore Health Restore Stamina Restore MagickaUse this if you need more sustain. It restores Stamina and Magicka on use, and also grants you Major Endurance and Major Intellect. -
Full Damage
Heroism Potion
Restore Magicka Restore Stamina Minor HeroismBasically a Tri-Stat Potion , but with the useless Restore Health changed to Minor Heroism . It's straight up an upgrade over Tri-Stat Potion , but expensive to craft.

 Bugloss
 Mountain Flower
 Mudcrab Chitin
 Columbine
 Dragon Rheum
 Dragon's Blood
Parses
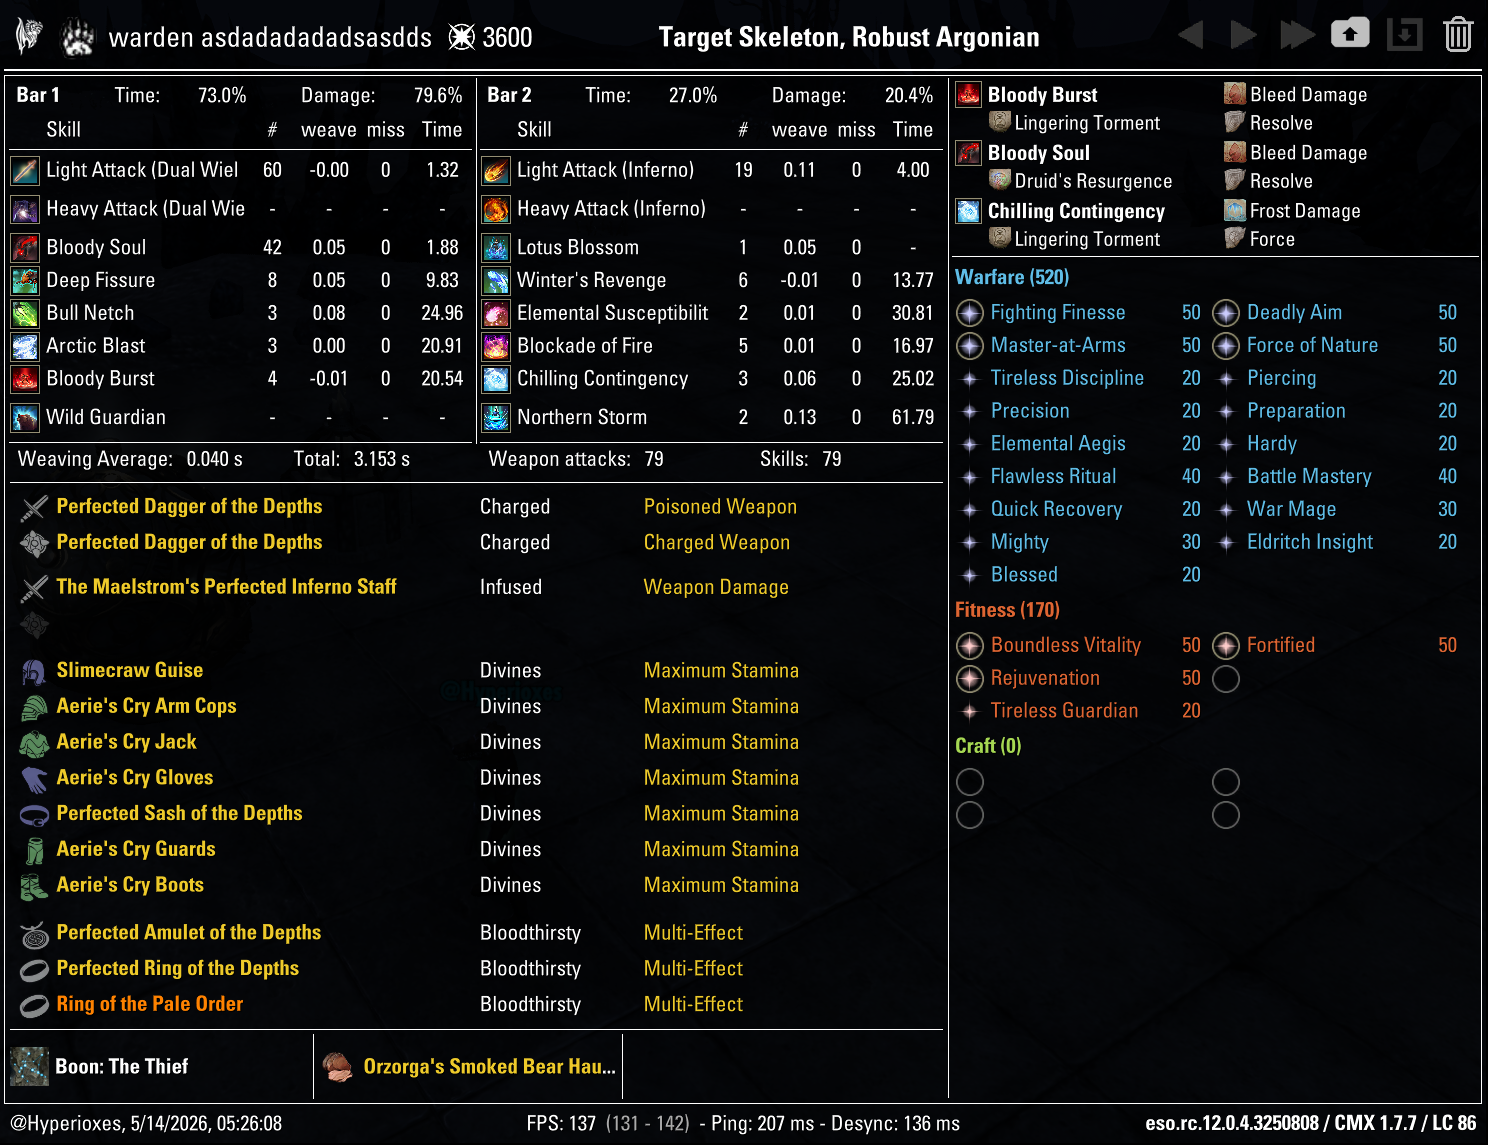
All parses are recorded on the 6 million Target Dummy

Gameplay
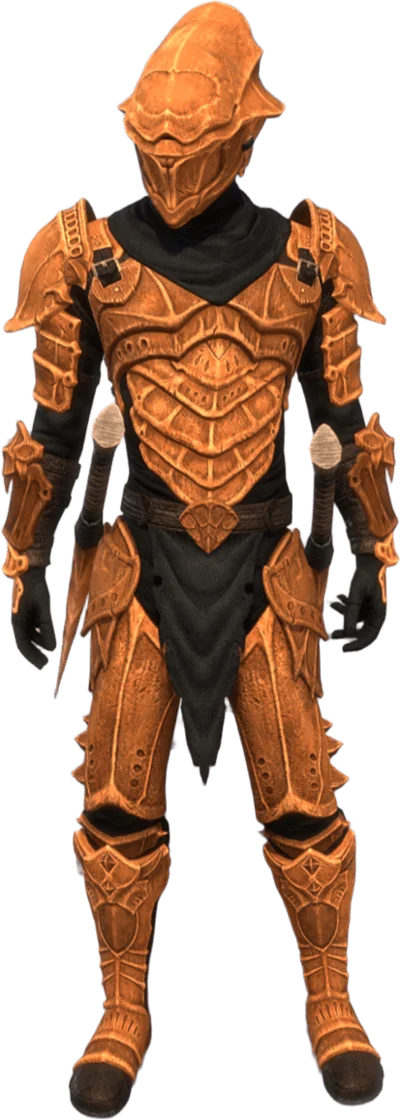
Fashion
| Slot | Style | Dyes |
|---|---|---|
| Head |  Bonemold Helmet Bonemold Helmet |
Anequine Sunrise
Empty
Empty
|
| Shoulders |  Bonemold Pauldrons Bonemold Pauldrons |
Anequine Sunrise
|
| Chest |  Bonemold Cuirass Bonemold Cuirass |
Anequine Sunrise
Empty
Empty
|
| Hands |  Bonemold Gauntlets Bonemold Gauntlets |
Anequine Sunrise
Empty
Empty
|
| Belt |  Bonemold Girdle Bonemold Girdle |
Anequine Sunrise
|
| Legs |  Bonemold Greaves Bonemold Greaves |
Anequine Sunrise
Empty
Empty
|
| Feet |  Bonemold Sabatons Bonemold Sabatons |
Anequine Sunrise
Empty
|
| Frontbar Main Hand |  Kra'gh Dagger Kra'gh Dagger |
Anequine Sunrise
Empty
Empty
|
| Frontbar Off Hand | Kra'gh Dagger |
Anequine Sunrise
Empty
Empty
|
| Backbar |  Kra'gh Staff Kra'gh Staff |
Anequine Sunrise
Empty
Empty
|
FAQ
Yes. It is not the strongest solo build in Update 50, but it is on the higher end, with strong sustain and constant purges from Bull Netch. It soloed Veteran Dread Cellar and handles World Bosses, the solo arenas, Infinite Archive Arcs 1-4, and Veteran Dungeons.
Yes. This is a pure class setup, so it keeps Warden skill lines and uses Class Masteries instead of subclassing.
Nord is the best all-round pick for solo. The armor from Rugged is worth the small damage loss in hard content, which is why I use it for soloing Veteran Hard Mode DLC dungeons. If you only care about damage, Khajiit and Dark Elf parse about 3.5% higher.
Dual-wield Daggers give the most damage, and the build does not rely on any Dual Wield skills so the weapon stays flexible. For a ranged option, Lightning Staff is only 2.8% behind and Inferno Staff 3.0% behind.
Yes. You can change the front bar weapon without changing any skills, since this build is not using Dual Wield skills. Daggers are still best, but Lightning Staff is only 2.8% behind and Inferno Staff is 3.0% behind, so those are the best ranged options. Bow does 4.8% less damage, Ice Staff does 5.1% less, Greatsword does 6.4% less, Restoration Staff does 11.7% less, and Sword and Shield does 14.9% less.
Yes, for Infinite Archive Arcs 1-4. Those arcs are still close enough to normal solo PvE content that a standard solo build works well, and you usually will not have enough important Visions yet to build around them. Some effects become more valuable in Infinite Archive, especially enemy Weapon and Spell Damage reductions, but you do not need a dedicated deep-IA build for Arcs 1-4.
For deep Infinite Archive runs, such as Arc 10+, this is not the right type of build. Deep IA setups have to change heavily around the Visions earned during that run, so they are usually built very differently from standard solo builds.
Yes, you can use this build at any Challenge Difficulty, including Vestige. Mobs hit a lot harder and you do less damage on the higher tiers, so fights take longer, but the build itself doesn't change.
No. Use the base skills and the Instanced gear setup for both Maelstrom Arena and Vateshran Hollows.